Welcome to WordPress. This is your first post. Edit or delete it, then start writing!
-
Badger 2040 – a low-cost board with rpi microcontroller and e-ink display
Here you will soon find a short post about my first experiences with the BADGER 2040. This is a low-cost, credit card sized board that you can buy here for GBP 16.50. The Badger combines the Raspberry Pi RP2040 controller with a nice electronic ink display. You can use either C/C++ or MicroPython as programming languages.

A first photo An easy way to create programs is to use the Thonny editor. This editor is quite versatile, it has a REPL (Read-eval-print-loop), so you can send Python commands directly to the BADGER and they will be executed. This is a nice way to try out code snippets.
Normally you will put your code into a file and then transfer it to the BADGER. The Thonny editor also allows you to view the files on the controller and those on your computer, so it is easy to move files forth and back within the editor. The editor will also highlight any syntax and runtime errors you make.
In order to familiarise yourself with Thonny and the BADGER, just follow the Tutorial. Here are some further remarks:

- You need to connect the BADGER to your computer. The USB socket on the BADGER is rather fragile, so please always hold a thumb on the socket when you connect/disconnect a USB cable. Furthermore, always use straight movements, do not bend or wiggle the connector as the socket may break off the board.
- You can find the code examples in a GitHub repository. A good way to get to know the BADGER and MicroPython is to read and understand existing code, modify the program and then run it to check if you get the desired outcome. In addition to the examples, you may need a bit of knowledge of Python and the MicroPython libraries being used. There are some lower level libraries/modules that are documented here and some BADGER specific libraries that are described here. The import statement at the beginning of a file will let you know where you have to look for. “import time” as an example means that functions of a module with the name time are being used, you find its description in the documentation for the MicroPython language. Below is a screenshot from the documentation. The example here shows functions in module time, they allow to delay execution or get timing information.
- If you want to get some more information about the controller, this may be a suitable site to get it.
- For the last examples of the tutorial you need to reformat a photo. You can find a short description on how to do that on a Windows machine here.
- Once you have finished your work, please do not forget to back up your files. If you have a GitHub account, you can also create a new repository and drag and drop the files there.

One more example, next step to your own programs …

So far you have only used the interactive REPL to enter code, upload it to the BADGER and then run the code. Normally you save your code in a file, then upload and run it on your machine, in our case the BADGER. The following file makes the LED on board of the BADGER blink. Create a new file using the green plus symbol in Thonny, and enter the 9 lines of code. In Python indentations need to be respected, they are part of the syntax. Once you are finished, click the round green button with the white flash. This will upload the file and run it.
-
The Console of the Chrome Developing Tools
The Google Chrome Development tools are very useful if you want to understand and learn about web programming.
The tools are integrated in the Chrome web browser and you can find them easily selecting the View Menu, then Developer and Developer Tools.

By default at the right side of the browser a panel will appear . For trying out some Javascript code, click on the Console tab and then clear the console.

The console allows you to enter small Javascript code snippets, just one line or a small block. When you have finished entering your command(s) behind the “>” prompt, press return on your keyboard to execute your code. If your code produces any output, it will be shown on the following line.
console.log(....) will print anything you ask it to print in between the parentheses. But methods and functions also have return values (like an output). If the function has nothing to return, it will often write “undefined“, no worries if you read this message.
-
How to Get Window Screenshots
Often you need to get a copy of your screen or a part of it for documentation purposes. There are many different ways available with Windows 10, my two favourite tools are mentioned here, they also give you some choice on what part of the screen you want to copy.
Snipping Tool
This tool is around already for a long time. It will not show up any more as an app, so you will need to type its name in the search bar at the bottom of the screen. Then you can choose it.

How to find the Snipping Tool with the Search Bar Click the New button to begin the screenshot process. The default snip type is a rectangular snip, but you can also take free-form, full-screen and window snips.
The Snipping Tool does not automatically save your screenshots — you will need to manually save them in the tool before you exit — and it does automatically copy your captures to the clipboard.
This tool maybe discontinued in the future, a message with that content will be displayed when you launch the app.
Snip & Sketch
This is a newer tool, the fastest way to launch it with the keyboard shortcut Windows key + Shift + S. You will also see the Snip & Sketch tool listed in the Start button as well as in the notification panel where it is listed as Screen snip, these are two alternative ways to start the app.
After launch, the screen will be dim and a tiny menu will open at the top of your screen. It lets you choose which type of screenshot you want to take — rectangular, free-form, window or full-screen.

Choices for a screenshot with Snip & Sketch, displayed at the top of the screen Once you take your screenshot, it will be saved to your clipboard. Click the notification that pops up to open the screenshot in the Snip & Sketch app to process it further in the app. You may also access the image via the notification panel.
There are other options. available with this tool, just have a look in the documentation.
Both these tools are not as powerful as some commercially available tools, but they give you the basic functionality and they are free-of-charge.
-
p5.js – Learn the basics about classes
Classes are a means to structure your program and make the code more easy to follow. A class allows you to put all variables and functions that create, manipulate and interact the same type of structure in one declaration and use them afterwards throughout your program.
(more to follow …)
-
p5.js – Learning about arrays
Arrays are a powerful element of programming languages. They allow to store and manipulate data using one name and then accessing individual data with an index (number). You can imagine them as a container that holds many objects.
You may also imagine a postman distributing letters in one street with a certain name, distinguishing the individual addresses by the house numbers. The name of the street compares to the array name in programming, the index has the same meaning as the house number.
The image below summaries the key features of an array and also visualises how the indexing works to create, access and delete fields of an array.

You have several ways to access the elements of an array. The most common ways are …
- You can use the array name with the index in brackets to set or get the content of one field, Burt also to add new items.
- You can use the push/pop methods to add or remove items at the end of the array.
- You can use the unshift/shift methods to add or remove items at the beginning of an array.
A full documentation on arrays can be found on the MDN website. It not only describes in words what the class and its methods are doing, but it also provides small editors with sample code you can modify and execute. For each method there are detailed descriptions accessible on the left side of the window (if your browser window is wide enough) with even more sample code to play with. Have a look.

Assignment
The following screenshot shows how the push and pop methods are working.
- Please follow the instructions given here to launch the Development Console of your Chrome browser and then do the example with the push and pop methods by yourself.
- Next try to figure out how the unshift and shift methods are working. You can have a look at the MDS documentation first (you find at in the array section).
We will work extensively with the Array methods for making games, so getting familiar with them will be very helpful later.
-
Micro:bit controls Neopixels
How to set up the hardware
Please follow the wiring shown on the photo below. There are two connections to the micro:bit, one is on the GND connector (the yellow cable on the picture), the other is on PIN0 (the white cable on the picture).
The Neopixels get their power from a battery pack, as they may draw too much current to be run via the USB interface and the micro:bit. The battery holder is made for 4 or 6 batteries. As we can only use 3, the missing battery is replaced with a wire (the green cable) in case of the holder for 4 batteries. The 3 batteries supply 4.5V, this is sufficient and safe, 4 batteries with 6V may destroy the Neopixels! The seconc photo below shows the wiring scheme with the battery holder for 6 batteris, again we only put in 3 batteries.


How to start coding Neopixels with MakeCode blocks
Here are some links for you if you want to code the Neopixels with MakeCode Blocks. There is a nice tutorial here. If you want to start by yourself, launch the web editor here, create a new project, then go to Advanced/Extensions/neopixel to download the blocks to control the Neopixels. Here is a simple example project, the block “Pick random 0 to 255” at the bottom needs to be entered for red, green and blue each, so three times!
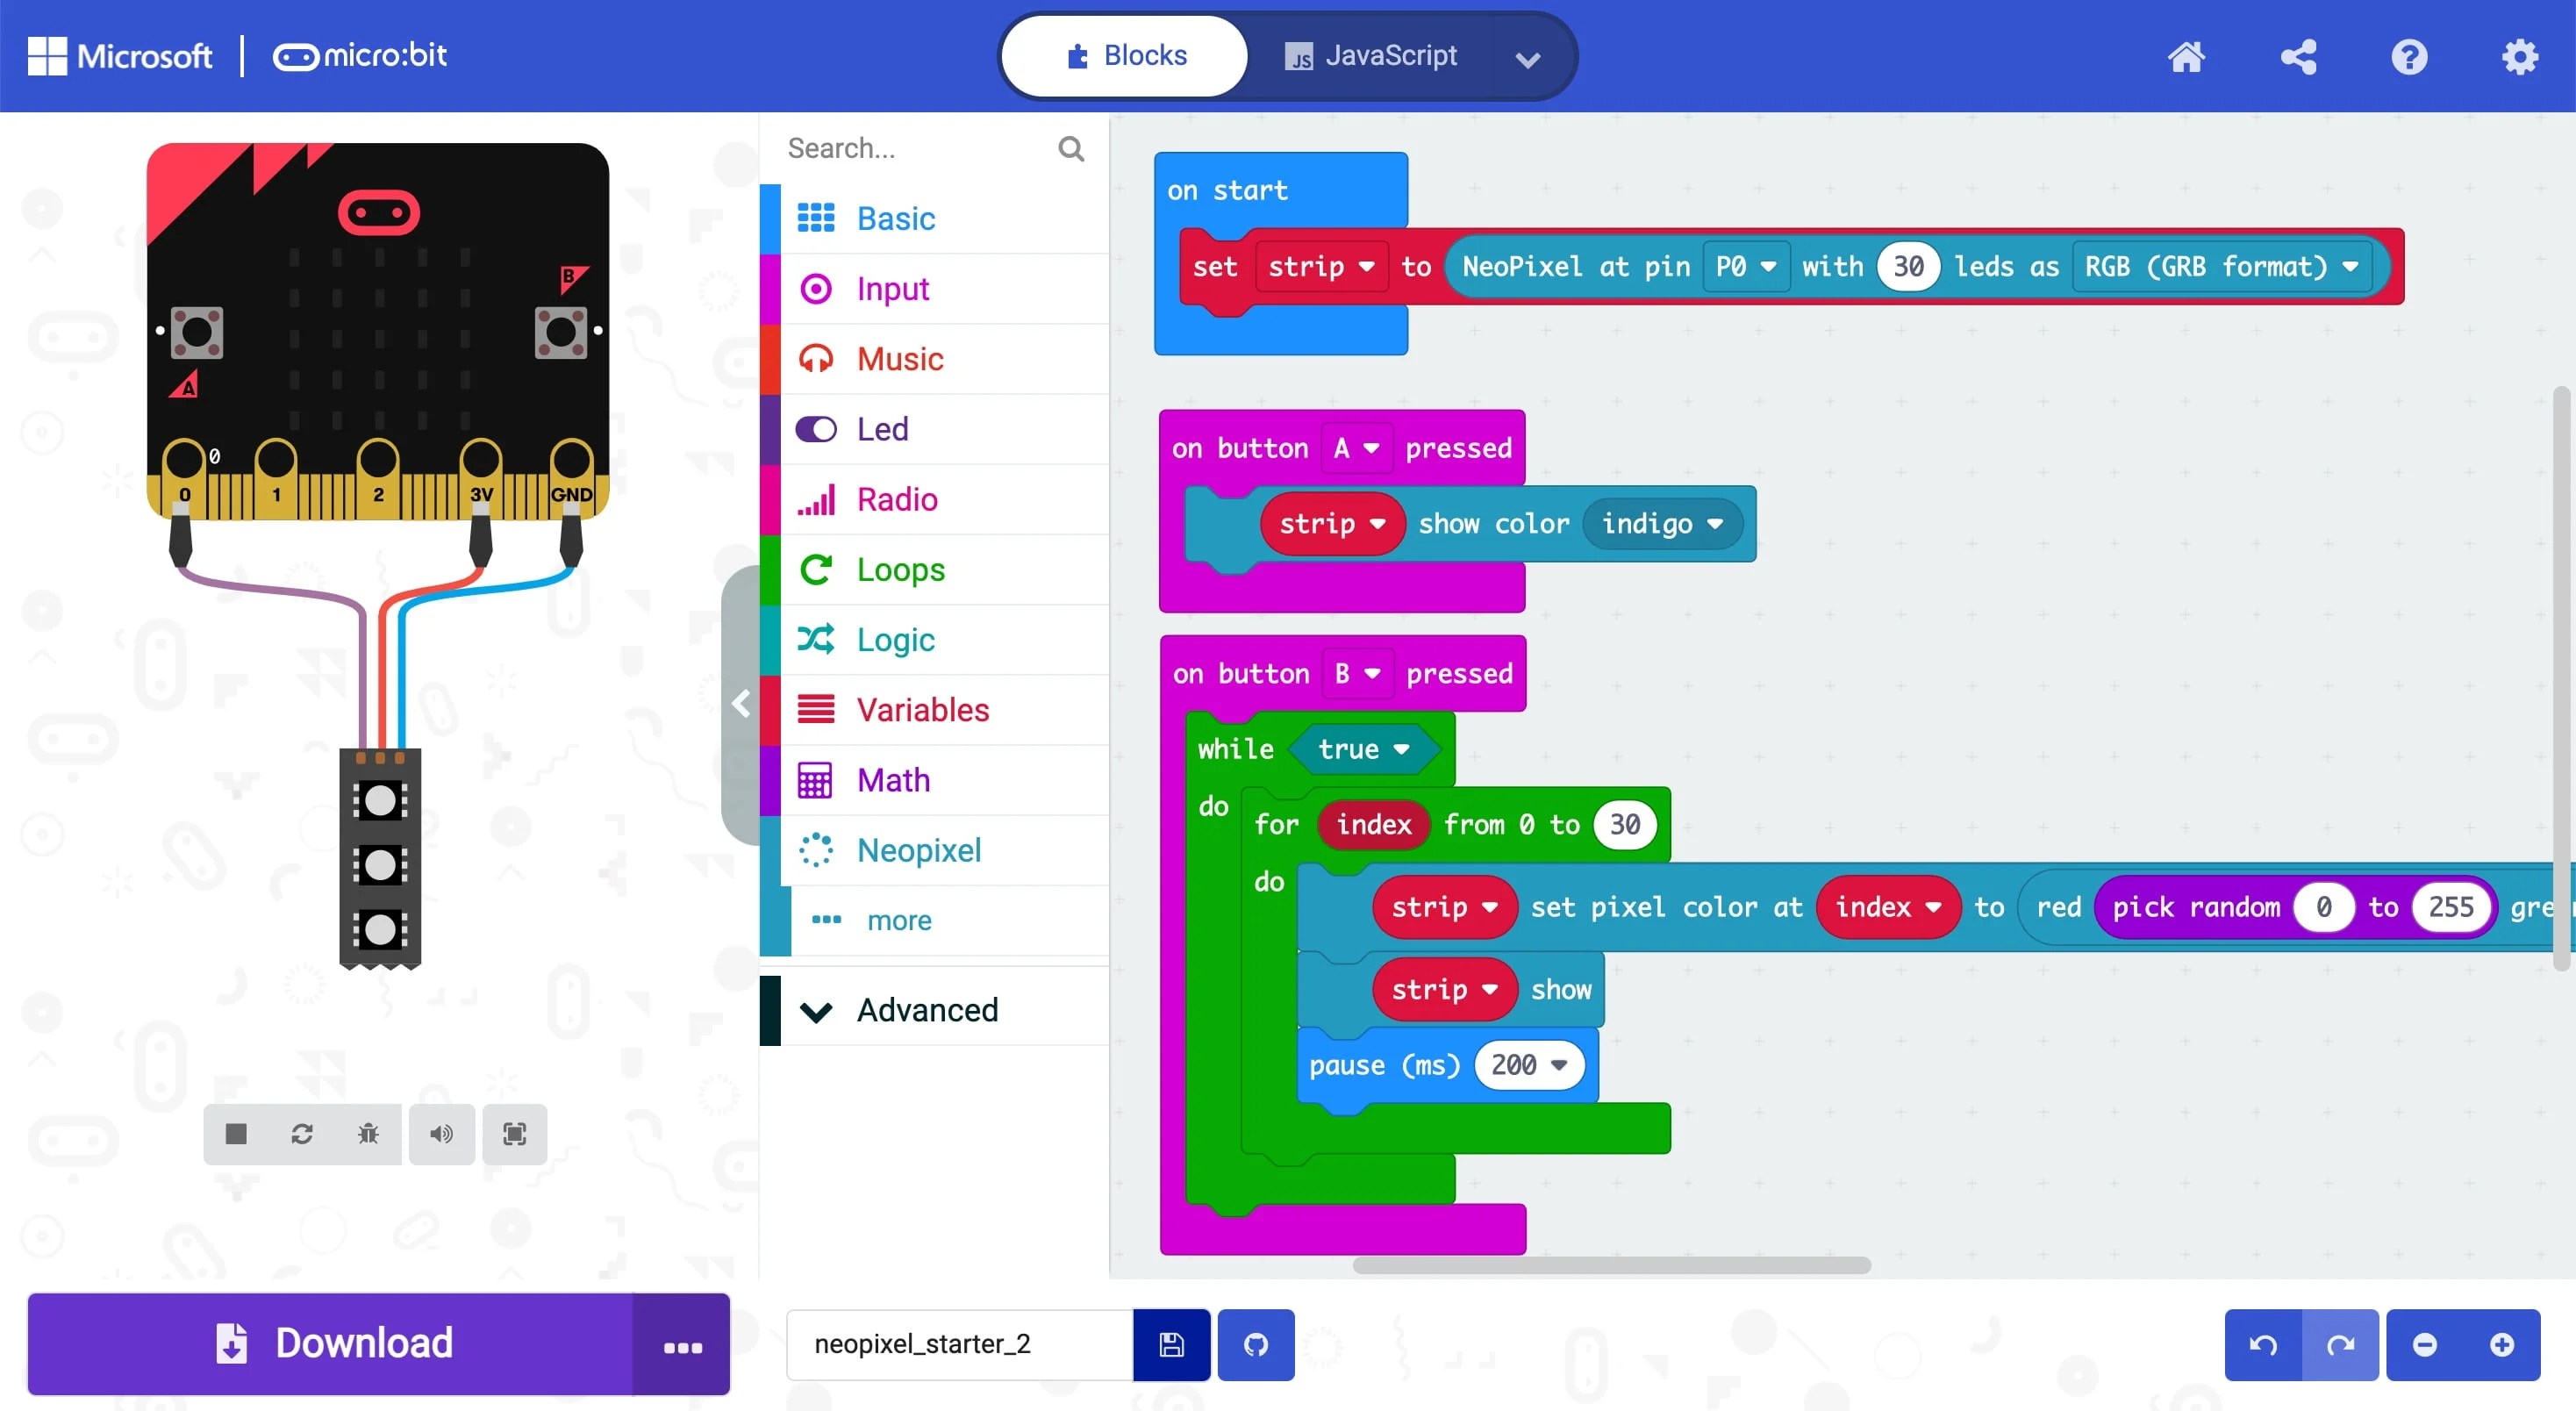
Here is another Makecode program that runs a rainbow on the 30 LED Neopixel stripe. You may notice that the for loop is different, it was wrong in the example above and is correct in the new code (why? Hint: How many LEDs do we have available on the stripe, how many do we count through in the for loop?)
The program uses a different colour encoding than the RGB (Red, Green, Blue) system we used so far. It is called HSL encoding and uses the three values Hue [0..360], Saturation [0..100] and Lightness/Luminosity [0..100]. The values inside the square brackets show the range the three parameters are allowed to have, see also the website here to play around with the parameters. For simplicity, change only the values of Hue in the given range and choose Saturation = 100 and Lightness = 50 to get bright and shiny colours.
In order to try out you code, you can actually run it in the simulator. This does even work for the stripe of 30 LEDs. It is good practise (and saves time) to test with the simulation first. When your code runs flawless there, upload it to the micro:bit and see it there in all its glory.

Here are some Micropython code snippets to upload, try out and modify to your liking.
You need to start a web browser and go to micro:bit to copy and paste the code below. Then press “Download” to create an executable file with the extension .hex. You find this file in your download folder. Next connect the micro:bit to an USB port and make sure that you see the micro:bit as a drive in the File Explorer. Then drag and drop the file onto the micro:bit drive icon. The yellow LED on the micro:bit will start to flash. If the program is correct, the program will start to run once the yellow LED lights up steadily. Otherwise you will get error messages with line numbers on the LED matrix of the micro:bit. Once you have fixed the errors, download again.
This first example changes the colour of the Neopixels one after another and leaves each pixel on until it is refreshed in a different colour.
[code language="python"]
"""
Repeatedly displays random colours onto the Neopixels.
Works for Neopixel strips of 30.
"""

from microbit import *
from neopixel import NeoPixel
from random import randint

# Setup the Neopixel strip on pin0 with a length of 30 pixels
np = NeoPixel(pin0, 30)
while True:
   #Iterate over each LED in the strip
   for pixel_id in range(0, len(np)):
      red = randint(0, 60)
      green = randint(0, 60)
      blue = randint(0, 60)
      # Assign the current LED a random red, green and blue value between 0 and 60
      np[pixel_id] = (red, green, blue)
      # Display the current pixel data on the Neopixel strip
      np.show()
      sleep(100)
[/code]
Here is another example with a different lighting pattern:
[code language="python"]

"""
Adafruit example, modified to run with 30 LED strip.
see at
https://learn.adafruit.com/pages/11472/elements/2981640/download
for the basic version with one running neopixel
180815 Modified the original version, but not yet debugged.
181001 Debugged and running!
"""

from microbit import *
from neopixel import NeoPixel

num_pixels = 30
foreground = [255, 0, 0] # Int color - red, green and blue
foreground2 = [0, 255, 0]
background = [16, 16, 16]

ring = NeoPixel(pin0, num_pixels)

while True:
   # red/green dot circles around a white background (for 30 neopixel strip)
   for i in range(0, num_pixels-1):
      ring[i] = foreground # set pixel i to foreground
      ring[i+1] = foreground2
      ring.show() # actually display it
      sleep(50) # milliseconds
      ring[i] = background # set pixel to background before moving on
      ring[i+1] = background
      ring.show()
      # implement the closing of the circle for last and first element.
      ring[num_pixels-1] = foreground
      ring[0] = foreground2
      sleep(50)
      ring[num_pixels-1] = background
      ring[0] = background
[/code]
ATTENTION: This code snippet uses the concept of a block of code. The lines in a block of code belong together, here they are inside loops starting with while and for … Everything inside the loop is repeated. In order for the interpreter to see where the blocks begin and end, each line inside is indented by four/eight spaces. The website may not show this properly. When copying the code over to your editor, please make sure that these lines remain indented.
Here you find the full documentation for the micro:python language with the micro:bit. The particular link brings you to the documentation for the Neopixel library.
-
The micro:bit
The micro:bit is a tiny computer that you can program with blocks and also with other programming languages. It has two buttons, 25 LEDS, and some more sensors built in, you can add more sensors (to pick up and measure events and data) and activators (lamps, other items to do something). If you are fancy to see more, have a look here on this website, there are more projects! Today you can create a small Rock, Paper, Scissor game, follow the link below.

How to use the micro:bit?
First, connect your micro:bit with the USB cable to the computer. Then you launch the editor and write your code. At the end you need to compile (translate) the code into something the processor on the micro:bit can understand and download it. When the download is finished (a red LED on the micro:bit will stop blinking) the program will start automatically. You’re done, congratulations!
-
Getting started with p5.js

p5.js is a programming language created for artists. It is easy to learn and uses Javascript, the computer language of the internet and beyond. p5.js runs on a web browser, recent versions of Firefox, Chrome or Safari are fine. As such you can even run it on a mobile phone or tablet. Here you go to the p5js homepage to get an overview over the language.
Normally you need to open several windows to run Javascript on a browser, and you also need to embed your code in some basic HTML and CSS structure. p5.js provides a so called IDE that allows you to focus on the main part, coding with Javascript. It consists of an editor, allows you to execute the code, read and write data, save code and more. Launch the p5.js Web Editor by clicking on the link. Then you can code away!
First, please create an account by clicking on Sign Up in the top right corner of the window and follow the instructions to create an user account.
Don’t forget to write down your username and the password! It is a good idea to save these credentials on your Google account, then you have it always available.
A short introduction to p5.js you find here. Whenever you have finished a program or need to stop, don’t forget to save your file by selecting Save in the File menu item of the editor. Later you can reload your project with Open and continue to work.
A more comprehensive source to learn p5.js is Getting Started With p5js. This is a good introductory book with lots of code samples you can copy and paste into the editor and try out. Happy Coding is another site that introduces you to p5.js covering some topics with tutorials, and others with sample code.
These information will allow you to get up and running, on this site you also find more posts on p5.js going into more detail and showcasing sample projects.
-
Edublogs Teacher Challenge – Step 2
Since starting to write here, I went through a couple of iterations with my blog.
Yesterday I set up a first classroom with a student’s test account. This was a really helpful exercise to understand the process and be able to explain it to the students when I resume classes.
I also realised that choosing a responsive WordPress theme is important for working at school. While I will use WordPress on computers at school, parents may just want to check their childrens’ work with mobile devices. So responsive (meaning running fine on both desktop and mobile devices) is an important feature. So when selecting your blog theme (and this also applies for your students when they are setting up their theme), choose a responsive theme.
I didn’t do so in the first place, so I changed my theme today. This was less troublesome than I thought because in Edublogs you can preview your content (posts, pages) with a new theme. So the more content you already have, the better you can judge how it will look like with a theme.
On the Edublogs course for teachers it is also suggested to set up blogging rules for your group of students. While you can simply copy some of the excellent suggestions made on the blog, you should just take them as a starting point and then add additional things that are important for you or your school. It is worth it, here are my rules
I also decided to separate this blog aiming only at my students and their parents more clearly from what I want to share with other educators and interested folks. So while right now I will continue to blog about my reflections here on the “student’s blog”, I will later copy the content to my other site. These blog entries will also help my students to better understand on how the blog was set up, but the same input will hopefully help you to set up your sites.
One last remark, depending on the theme you are choosing, you will need to get your pages appear. The easiest way is with widgets, but nicer is using the menus. Have a look at the documentation of WordPress.
When you decide to make your contact form with Formidable, first create your form. The plugin has changed compared to what is shown in the Edublog Teacher’s Course, but the new documentation is helpful. Then you can either add the Formidable widget to show your contact information. Better is to create a new page “Contact Me” and then add only the Formidable shortcode [formidable id=..]. You find the .. , a number, when opening the Formidable plugin, see the image just below this paragraph. The contact form will then be a page like the others and can be displayed the same way.
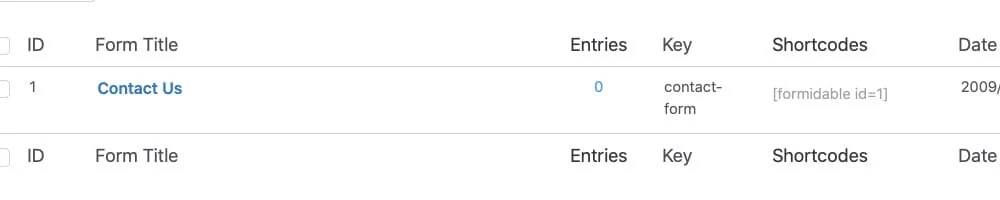
Formidable main view with forms and their shortcakes The About, Blogging Rules and the Contact form are now all up and running, so please feel free to give me any feedback you want to share.
Thank you for following me on my journey so far.
Michael