Skip to content

My WordPress Site

    • About Me
    • Basic Law of Blogging
    • Contact Me
    • Creative Coding
    • My Diary
    • Sample Page

  • Edublogs Teacher Challenge – Step 1

    What are the first blog entries here all about?

    The following blog entries describe my voyage to set up my Edublog. As such it contains also a lot of reflections about what worked out and which pitfalls I ran into. In the coming weeks, I will set up this site for blogging with one of my classes following the edublogs Teacher Challenge.

    What do I want to achieve with my blog after the setup stage?

    I will use it for my ICT after school activities to provide basic information, links to supportive material as well as assignments. Furthermore, I plan to open up blogs for the students to describe what they are doing, reflecting on their work, commenting and also getting feedback from parents.

    What am I going to write about here?

    Today I will focus on how code can be represented in WordPress, comparing in particular handling and display of code with the old “Classic Editor” versus the new “Gutenberg Editor”. For me there are two ways how to give my students access to code:

    Sometimes I want that the students go through typing and debugging code by themselves. I want to avoid that they are just copying and pasting code snippets and make them run without thinking what they have done. In these cases it is best just to post an image of the code in jpg format, something they can not simply copy and paste into their IDE.

    Other times, code here may serve as starter code, then it is great if they can copy and paste lines and add their own parts to it. Making code available here is a quick way to cater for this scenario. An even better way may be GitHub Classroom, once I have run the first classes with this tool, I will share my experiences here.

    In the following I will share my experiences on how to handle the second scenario best.

    Displaying Code Snippets

    Today I have played a bit around with the possibilities to format code snippets. I have another site hosted on WordPress.com. The Premium package I have subscribed to gives you ample storage space, and most important good exposure to search engines. On the downside, that package does not allow for any plugins to be installed. So a lot of helpful add-ons are not available.

    Edublogs on the contrary allows you to install at least from a selection of plugins.

    For coding in particular, the SyntaxHighligher Evolved is really useful to format code with keyword highlighting for various programming languages, indentation and line numbering. You also get “copy & paste” ready code snippets. This tool for syntax highlighting is available for the “old” Classic Editor in WordPress.

    As I decided to go with Gutenberg, the new WordPress editor, you only get plain vanilla code snippets. But with a bit of work you can still select the Classic Editor for individual blocks, do some editing in HTML mode and then get the code nicely formatted.

    Here is the famous “Hello World” in C++, first with the old syntax highlighter written in the Classic Editor, next with the new Gutenberg code block. Compare for yourself.

    [code language=”cpp”] #include <iostream> using namespace std; int main() { cout << " Hello World!\n"; return 0; } [/code]
    #include <iostream> 
    using namespace std;
    
    int main() {
        cout << " Hello World!\n"; 
        return 0; 
    }

    Both examples are nicely formatted, all the indentations are there. But the second snippet misses the colour highlighting of keywords as well as the line numbering. For the moment I will mostly use the new editor, sooner or later a similar plugin will be available here on Edublogs for Gutenberg, they are already out there for self-run WordPress sites. In the meantime when required, I will fall back to a classic code within Gutenberg.

    Two more sites to check out …

    I also run two more ICT related sites, www.code2run.com and www.mikefromd.github.io. The later will only come live in the coming weeks. I will use it with GitHub Classroom for my students to provide sample code to remix and code fragments to start with, I mentioned this earlier. The other site code2run has examples and descriptions on how to use various educational platforms as Alice 3, Arduino, p5js (a Javascript Library with IDE derived from Processing). Have a look at those sites if these subjects are interesting for you.

    February 17, 2020

  • Alice 3: Move the hand up to show “ok”

    181218 handOKProcedureScene.jpg

    The code below let a person raise his hand and form the ok sign with his index finger and thumb. This method can be used with all sprites that have a hand with fingers. They are arranged in the class Person. Therefore we create the procedure for this class and can then use it for all present and future persons in our project.

    181218 handOKProcedureCode.jpg

    December 5, 2019

  • Alice 3: Make a biped walk

    There is a nice video on how to create procedures that allow you to make bipeds (i.e. characters with two feet) walk. It is here

    The movement has been separated into two procedures, the first halfstep called “firstStep()”.

    181210 Alice firstStep.jpg

    Next we create a procedure for a full step with both legs called “walk()”.

    For that we also need to create a Biped property that keeps track of which leg moves last so that next time the other leg moves. You create it also by clicking on the yellow hexagone and choose create Biped property. Here is the requester that comes up with all data you need to fill in. This property only has two values signaling which leg to move next. Values of type Boolean have only two values, they are suitable for this task.

    181210 createBipedPropertyLeg.jpg


    181210 Alice walk.jpg

    Here are the two procedures used inside “myFirstMethod()”, the rest of the program is for another project, it also contains code to use colour effects.

    181210 Alice walkInMyFirstMethod.jpg

    Here is an add-on, it is the function walkSteps(steps). Here steps is a parameter that tells the method how many steps to take.

    181211 walkSteps.jpg


    Object oriented design elements with classes and their properties and methods as well as inheritance as a way to structure classes.

    All sprites and props in Alice are arranged in a class hierarchy.

    You have already encountered class hierarchies in biology. They allow animals and plants to be classified by certain criteria in a taxonomy or hierarchy. The criteria go from more generic at the top of the tree (Domain in biology) to more specific at the bottom of the tree (Species in biology). A species shares most of the properties of the respective genus, and has different ones to distinguish itself from other species.

    640px-Taxonomic_Rank_Graph.png

    Source:

    The same concept is applied in the class hierarchie in Alice. Here the more generic classes are called parent classes, a class derived from one parent may be called child class. When you are on the “Setup Scene”, you see all characters and props arranged in classes at the bottom. The class Biped contains humanoids, but also monkeys and other animals, all of them are walking on two legs, at least in Alice. In order to create a biped character on your scene, you select the class Biped, being the parent class, and then define a child class with individual properties as age, clothes, hair, … . The class Biped also provides methods that allow you to let them act that inherited to the child class. Inside the child class you can then define own properties and methods that are only applicable to that particular class.

    Inside Alice the class hierarchie can be visualised by clicking on the yellow hexagone beside the Scene Tab in the Code Editor. Here is a screenshot how it may look like. You can see the inhertance structure be the amount of identation, i.e. AdultPerson is a child class of Person that is a child class of Biped.

    181210AliceInheritage1.jpg

    If you want to create a procedure to make a biped walk, you select the Biped class, and then code your procedure. As a result, the procedure is available to all characters that are derived from the biped class, existing ones, but also those you may create in the future.

    This is a major characteristic of so called Object Oriented Programming and helps you to structure your work and avoid repetitions of similar properties and methods.

    December 5, 2019

  • Alice 3: Making a biped talk or sing

    This video revises again the concept of objects and shows you how to create talking person, with sound and movement of the mouth.

    Here is a code snippet for this, and a short description on how to create it:

    1. Add it as a procedure to the biped class, so that you can use it for all your bipeds later. For this, go the Code Editor, select the yellow hexagone at the top beside the Scene tab, and then select “Add Biped Procedure” after choosing “Biped”. in the example below the procedure is called “moveMouthToTalk()”.
    2. Next click the “this” biped above the Procedures/Functions tab on the left and by clicking and then hovering select the SBipedJoint mouth. This gives you access to all procedures and functions available for the mouth.
    3. Next drag and drop two turn method blocks on the left under “do in order” and change the parameters as shown in the screenshot below. You are now done with the mouth movements.
    4. That’s it, you have created the moveMouthToTalk procedure. In order to use it, you need to call it from within the myFirstMethod(). Make sure that you select the correct character that you want to sing and use “do in order” and “do together” blocks properly nested.

    181210 moveMouthToTalk.jpg


    December 5, 2019

  • Alice 3: Audio Files in Alice

    181210 AudioInAlice1

    When importing audio files into Alice, they should be as small as possible, not exceeding 3.6MB, this value may vary.

    There are audio files with music and sounds provided as part of Alice, you can access them by clicking in the menu on “Project” and then select “Resource Manager”. The above panel will pop up, click on “Import Audio” and then browse and select the content you like to have. All these files do not exceed 1.6MB.

    You can also import an own music file to Alice. Find a audio file in the internet, make sure that it is legal for you to copy it.  If the file is in mp3 format, you can directly import it into Alice. You just follow the instructions above, locate your audio file as explained before and import it. Try to play the file with the built in audio player, If it is not playing, it most likely exceeds the size limit. Then you need to minimize the size of your audio file with programs as Garageband (Mac) or Audacity (Windows). The best way is normally to reduce the audio compression to a bitrate of 64kBit or 128kBit, both values give you still a sufficient audio quality. You may also shorten the playtime of your song. You can find instructions on how to do change the bitrate with the search term “compress audio audicity” or “compress audio Garageband”.

    If you are curious to learn more about audio quality and compression algorithms, have a look here.

    December 5, 2019

  • Make the Pong game with p5.js

    191017 PongWithTwo.jpg

    Introduction

    The game is derived from the video Codetrain: pong game. The coding is broken down into different phases, implement each phase, do the testing and then proceed. Have fun!

    We are using object oriented programming to make our game.

    Object oriented programming (OOP):

    So far we have made simple programs with procedural programming. We were putting all the code in one file, sketch.js.. In this paradigm, one line is executed after the other, loops and conditionals (if statements) control the flow of the program. We “outsourced” repetitive tasks into functions, these we could call whenever we needed their functionality.

    Objectoriented Programming is different as we are modelling our problem into parts or objects. These objects have properties and methods and are interacting via their methods.  What does this mean, how does this apply to our game?

    In a pong game we have two types of objects, the puck (ball) and the paddles to play the puck. The objects are defined within a class, that is a sort of template defining the properties (for a puck location, speed and size) and what it can do (show itself, change its location, react when been hit by the paddle, etc).

    191016 PongObjects.jpg

    Phase 1: Get the puck

    Objective: Get a puck that launches in the middle and then moves towards the borders of the canvas.

    The class Puck is defining the properties and actions what the puck can do.

    The puck has five properties, location (with its coordinates x, y), its speed (also broken down into two components, speed in x direction vx and in y direction vy and its radius (size) r.

    Inside this first version of the class Puck,we have four methods. The constructor() is creating a new puck, it also defines variables for its size, location and speed and puts some initial values to those.

    The methods update() and show() change the location of the puck and show it on the canvas.

    The method reset() is defining the location, direction and speed of a  new ball. We will use it later in the game whenever a point has been made and the puck needs to reappear.

    To create a puck, we are calling puck = new Puck() in the setup() function. puck is then the name of the object. Methods of an object are executed with the syntax OBJECTNAME.METHODNAME(…). Example, in order to change the location of the puck, we call puck.update(), puck.show() will then draw the puck. These commands are inside the function draw that is bascially a loop.

    191017 Pongp5jsPhase1.jpg


    Phase 2: Create the paddles

    Objective: Get two paddles, located at the left and right side of the canvas.

    Now we create a new a class Paddle describing the “racket” to play the puck. As a first step we only create two static (i.e. fixed) paddles. The constructor has this time a variable isLeft. It can take two values, true or false. If it has true, we create the left paddle when called, if it is false it creates the right paddle.

    191017 Pongp5jsPhase2A.jpg

    Then create the two paddles by calling the constructor in the setup() function, we show them by using the update() and show() methods. Add the highlighted lines to your exisiting functions:

    191017 Pongp5jsPhase2B.jpg

    Phase 3: Move the paddles

    Objective: Move the paddles with the keyboard.

    Now we add an event loop. Event loops are checking the status of events, i.e. mouse buttons pressed, keyboard entries. We will use the keyboard to control the paddles. First, only enter the function keyPressed(). How do the paddles behalf?

    Then add the keyReleased() method and see if the paddles are easier to handle.

    IMPORTANT: After starting your sketch, you must click the mouse once inside the canvas for the events to reach your program.

    191017 Pongp5jsPhase3.jpg

    Phase 4: Let the paddles hit the puck

    Objective: The puck is reflected from the paddle.

    The following two methods allow the puck to be hit by the paddle. Add them inside the class Puck.

    191017 Pongp5jsPhase4A.jpg

    In order call the new methods, add the highlighted code inside the function draw().

    191017 Pongp5jsPhase4B.jpg

    Phase 5: The puck recognizes the borders of the canvas

    Objective: The puck is reflected from the upper and lower edge of the canvas, it disappears when passing the left or right border. Furthermore, in the later case a new puck appears in the middle and starts moving.

    191017 Pongp5jsPhase5A.jpg

    Here is the addition to the function draw(). Make sure that the methods are called in the same order as shown here. You may need to rearrange their order.

    191017 Pongp5jsPhase5B.jpg

    Phase 6: The complete game:

    Here is the complete game with the counter. You need to add the declaration of the two variables to count (i.e. leftscore and rightscore, line 4 and 5 in the main function. Line 31 to 33 show the counter on the canvas.

    Inside the class Puck, you add the counter to the method edges(). leftscore++ and rightscore++ add 1 to the counter whenever the puck passes the left or right border of the canvas.

    The main function:

    191017 Pongp5jsSketch.jpg

    Class Puck

    191017 Pongp5jsPuck1.jpg

    191017 Pongp5jsPuck2.jpg

    Class Paddle

    191017 Pongp5jsPaddle.jpg

    Further things to do:

    1. Change the size of the puck.
    2. Change the paddle size, where do you do it? Do the changes apply for both paddles and why?
    3. Change the colour of background, puck and paddles.
    4. Can you control one paddle with the mouse, what do you need to add/change and where? The paddle should only move on the y axes, irrespective on the x location of the mouse.
    5. Add a second puck. You only need to make changes in function draw(), adding six lines of code will do the job. Do you have an idea how to do it?

    Program:

    Pong for Two

    October 17, 2019

  • Scratch

    Scratch is a block based programming language. You do not need to type code, but you just assemble projects with blocks of different functionality and configure those with simple entry of numbers and text. Scratch runs on a web browser and you can also interface it with some hardware. But where to start with Scratch?

    The Code Club is a UK charity that promotes computer science for young people as yourself.  They offer very comprehensive and detailed project tutorials, from small animations to a more complex  RPG(*) game.

    Here is the link to the site:

    Code Club Project Create your own world

    (*) A role-playing game (sometimes spelled roleplaying game;[1][2] abbreviated RPG) is a game in which players assume the roles of characters in a fictional setting. Players take responsibility for acting out these roles within a narrative, either through literal acting, or through a process of structured decision-making regarding character development.[3] Actions taken within many games succeed or fail according to a formal system of rules and guidelines.[4] [Source: Wikipedia]

    September 18, 2019

  • Make with the Arduino, with discrete hardware and Grove

    This blog describes the basics on how to use the Arduino with the installable Arduino IDE application. This is the program you need to write code for the Arduino and then upload it on the hardware. Following are three examples on what you can do with the Arduino.

    1. Set up LEDs on a breadboard anc control them with the Arduino.
    2. A short introduction to the GROVE platform that allows you to connect various sensors and actuators to the Arduino by simply plugging connectors to an interface board. This section also gives you links to look for sample projects and code snippets.
    3. A project using NEOPIXELs, controlled by the Arduino.

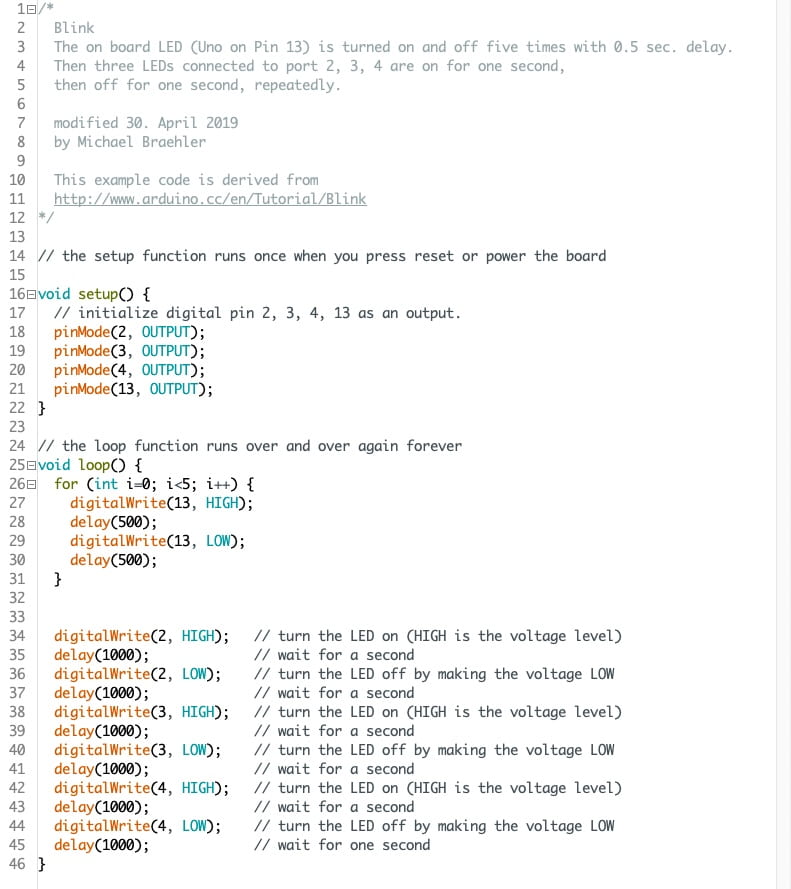
    The following image shows a traffic light arrangement of LEDs. The three LEDs are connected to the Ports 2, 3 and 4. The minus cable from the breadboard gets connected to the GND port of the Arduino.

    Arduino with breadboard, a traffic light with LEDs

    The wiring scheme on photo.

    UNADJUSTEDNONRAW_thumb_2b8d.jpg

    Here is the code doing some on and off with the LEDs.

    190502LEDTrafficCode.jpg

    Using the Arduino with the Grove platform

    Introduction

    UNADJUSTEDNONRAW_thumb_2b8c.jpg

    The Grove platform consists out of a shield with 4 pin connectors that allow to easily connect sensors and activators to the Arduino board. The shield is stacked on top of the Arduino board. There are

    1. 4 Analog inputs or outputs, labeled A0 to A3
    2. 7 Digital inputs or outputs, labeled D2 to D8
    3. 1 UART interface for serial communication
    4. 4 I2C communication ports, that’s a serial bus, labeled I2C. This bus is used for devices as the Ultrasoundsensor, LCD display and other sensors or activators that send or receive more complex data than what can be handled with the analog and digital ports. Each of the I2C device gets a hardware or software assigned ID so that your code can address each device individually and make it do the things it can do.

    Each 4 pin connector has GND (or minus, OV), VCC (this is 3.3V or 5V depending on the switch setting beside the reset button/green power LED) and two data pins, they are different for each connector. When you are using the Grove cables,

    1. red is 3.3V/5V or VCC
    2. black is GND or 0V
    3. white is a data wire, look at the Grove shield
    4. yellow is the other data wire, look at the Grove shield

    Project Ideas

    Here is a link to the manufacturer of the Grove system, Seeedstudio. The Project One to Project Eight are good ways to create small projects.

    190507SeeedExProjects.jpg

    Here is a photo with some of the Grove sensors and activators available.

    UNADJUSTEDNONRAW_thumb_2b8e.jpg

    For Project Six, you can also use the “Grove LCD RGB Backlit”. You can find more information including wiring and sample code here. Please also use the code sample shown here as the function calls may be different to those in Project Six.

    External libraries for the Arduino IDE (required for the following project with the Neopixels)

    For some sensors and activators you need to download external libraries. These contain functions that make it easier for you to use the devices. With the Arduino Version 1.8.9 you can download them easily by selecting “Tools” in the menu and then “Library Manager”.

    190507ArduinoLib1.jpg

    The photo above shows the library you need to download to run the Grove LCD RGB Backlit module.

    The Grove website shown above has a good document for all sensors and activator boards. So check there for more information and in particular sample code that you can then remix to your liking.

    Arduino With Neopixel

    Here you find a tutorial on how to connect a chain of Neopixels to the Arduino, which library to download and some sample code.

    Setup the Hardware

    The Neopixel requires more power than the Arduino can handle if all LEDs are on and will destroy it. Therefore you need to beef up the power supply and run the Neopixels with 3 x 1.5V batteries. Have a look again at the first lesson we had and ask for help, here is also a photo of the full hardware setup for your reference.

    UNADJUSTEDNONRAW_thumb_2b93.jpg

    The red and white cable coming from the Grove shield remain unconnected, the black is 0V and connects to the OV or Minus of the battery pack and the black cable coming from the Grove shield. A red cable with crocodile clamps connects the Plus (+) of the battery pack with the red cable from the Neopixels.

    If that’s too much of a hazzle for you, just use the stripe with 5 Neopixels, you can easily fix it on the breadboard, it does not require any additional power. Connect matching cable colours to the Grove interconnection cable, red to red, black to black and yellow to yellow. Then download the library and follow the instructions below. You will need to initialise the Neopixel for 5 Pixels only.

    Coding

    Once you have the Neopixels and the PC connected to the Arduino, open up the Arduino IDE, download the Adafruit Neopixel library. It also contains sample projects to start with. Have a look in the Menu under File/Example/Adafruit Neopixel. A good starting point is the sketch “simple”. You need to change two values in this program.

    1. The numerical value for the constant PIN needs to match the port number you have chosen. On the photo it is D4, so you enter the number 4.
    2. Next you have to tell the program how many Neopixel your stripe has. The long one has 32, so change the value of the constant NUMPIXELS to 32.

    The program is well documented, so just read and do the two changes where it is highlighted.

    Here is the complete sample code, reduced to the parts you really need and their comments, all changes have been done already.

    190514 neopixelSample.jpg

    When you experiment with the code, the following hints may be helpful:

    1. random(min, max) is a function that returns a random integer number between min and max-1. If you declare random(0, 128) the function will return a value between 0 and 127. You may use it to choose a random colour.
    2. In the programming language C you need to declare the type of a variable before using it. int jvariable is declaring the variable with name jvariable as of type integer, so it can contain whole numbers.
    3. Otherwise loops (for …, while …) and conditionals (if else …) and the highlighting of blocks with curly brackets ( {}  ) is similiar to Javascript.
    May 7, 2019

  • How to use audio in P5JS skripts – Part I

    190122 ImageAnimP5.jpg

    https://editor.p5js.org/mikefromd/embed/qSTMuQNjs

    How to delay the execution of something in Javascript?

    In order to delay the execution of a code snippet in Javascript, use the setTimeout() method.

    Its syntax is as follows:

    setTimeout(functionName, delay)

    FunctionName is a call back function that will be executed after the time fixed in the parameter delay has passed. In this video you get more details on how to use this function:

    General remark before starting with the audio libraries:

    The following tutorials are from Daniel Shiffman and can all be found on his Youtube channel “Codetrain”. I have selected some basic ones for you to get started with audio. Please remember that you have to download your audio file first into the editor, only then the player can access them and you can get your code running.

    Please remember that you need to log in with P5JS to be able to upload your audio files. You can then drag and drop them into the field opening when you select Sketch/Add File.

    Sound with p5.js

    Load and play a sound file

    Here is again a video about how to load and play an audio file. Again like with image files, you should use the preload function to make sure that the whole file is loaded before you start to play it.

    Besides the basics you see how to change the volume, the rate or speed of the playback as well as the pan (left and right side effect).

    This is the code for the basic audio playback

    Adding control buttons to your audio player

    The following video shows how to add a button playing and stopping the audio.

    Here is the finished code for the playing and pausing of the audio track.

    Put it all together …

    The image and the link to the p5js script at the beginning of this blog show you what you can do while combining audio, images and small animations in P5JS. Give it a try!


    January 21, 2019

  • p5.js – Get to know it better

    Some Resources to proceed with your learning:

    This is a copy of a book introducing P5JS covering all basic features.

    I suggest that you have a look, copy and paste some code snippets into the editor to execute them and then try to understand what is happening. The text will help you further with that.

    In the coming two lessons we will focus on the content in Chapter 7 (images) and 8 (sound). To try out the projects, you need to download the images and sound files provided.  They are in  media (images, sounds, etc.), you can download them from this Github Repository.

    If you are not too comfortable yet with p5js, I encourage you to start with the earlier chapters first and try to get deeper into programming.

    Flappy Bird

    Here is a video describing an implementation of the Flappy Bird game with P5JS.


    This is a link to another Github repository with the source code for the game. You need to open the files, copy and paste the content into files with the same name that you created in your p5 editor. To create the files pipe.js and bird.js, select “Sketch” in the editor’s menu and then “New File”. Enter the file name with extention. For sketch.js and index.html just replace the content of the existing files.

    January 15, 2019

Previous Page Next Page

Designed with WordPress

Loading Comments...