This video revises again the concept of objects and shows you how to create talking person, with sound and movement of the mouth.
Here is a code snippet for this, and a short description on how to create it:
Add it as a procedure to the biped class, so that you can use it for all your bipeds later. For this, go the Code Editor, select the yellow hexagone at the top beside the Scene tab, and then select “Add Biped Procedure” after choosing “Biped”. in the example below the procedure is called “moveMouthToTalk()”.
Next click the “this” biped above the Procedures/Functions tab on the left and by clicking and then hovering select the SBipedJoint mouth. This gives you access to all procedures and functions available for the mouth.
Next drag and drop two turn method blocks on the left under “do in order” and change the parameters as shown in the screenshot below. You are now done with the mouth movements.
That’s it, you have created the moveMouthToTalk procedure. In order to use it, you need to call it from within the myFirstMethod(). Make sure that you select the correct character that you want to sing and use “do in order” and “do together” blocks properly nested.
When importing audio files into Alice, they should be as small as possible, not exceeding 3.6MB, this value may vary.
There are audio files with music and sounds provided as part of Alice, you can access them by clicking in the menu on “Project” and then select “Resource Manager”. The above panel will pop up, click on “Import Audio” and then browse and select the content you like to have. All these files do not exceed 1.6MB.
You can also import an own music file to Alice. Find a audio file in the internet, make sure that it is legal for you to copy it. If the file is in mp3 format, you can directly import it into Alice. You just follow the instructions above, locate your audio file as explained before and import it. Try to play the file with the built in audio player, If it is not playing, it most likely exceeds the size limit. Then you need to minimize the size of your audio file with programs as Garageband (Mac) or Audacity (Windows). The best way is normally to reduce the audio compression to a bitrate of 64kBit or 128kBit, both values give you still a sufficient audio quality. You may also shorten the playtime of your song. You can find instructions on how to do change the bitrate with the search term “compress audio audicity” or “compress audio Garageband”.
If you are curious to learn more about audio quality and compression algorithms, have a look here.
The game is derived from the video Codetrain: pong game. The coding is broken down into different phases, implement each phase, do the testing and then proceed. Have fun!
We are using object oriented programming to make our game.
Object oriented programming (OOP):
So far we have made simple programs with procedural programming. We were putting all the code in one file, sketch.js.. In this paradigm, one line is executed after the other, loops and conditionals (if statements) control the flow of the program. We “outsourced” repetitive tasks into functions, these we could call whenever we needed their functionality.
Objectoriented Programming is different as we are modelling our problem into parts or objects. These objects have properties and methods and are interacting via their methods. What does this mean, how does this apply to our game?
In a pong game we have two types of objects, the puck (ball) and the paddles to play the puck. The objects are defined within a class, that is a sort of template defining the properties (for a puck location, speed and size) and what it can do (show itself, change its location, react when been hit by the paddle, etc).
Phase 1: Get the puck
Objective: Get a puck that launches in the middle and then moves towards the borders of the canvas.
The class Puck is defining the properties and actions what the puck can do.
The puck has five properties, location (with its coordinates x, y), its speed (also broken down into two components, speed in x direction vx and in y direction vy and its radius (size) r.
Inside this first version of the class Puck,we have four methods. The constructor() is creating a new puck, it also defines variables for its size, location and speed and puts some initial values to those.
The methods update() and show() change the location of the puck and show it on the canvas.
The method reset() is defining the location, direction and speed of a new ball. We will use it later in the game whenever a point has been made and the puck needs to reappear.
To create a puck, we are calling puck = new Puck() in the setup() function. puck is then the name of the object. Methods of an object are executed with the syntax OBJECTNAME.METHODNAME(…). Example, in order to change the location of the puck, we call puck.update(), puck.show() will then draw the puck. These commands are inside the function draw that is bascially a loop.
Phase 2: Create the paddles
Objective: Get two paddles, located at the left and right side of the canvas.
Now we create a new a class Paddle describing the “racket” to play the puck. As a first step we only create two static (i.e. fixed) paddles. The constructor has this time a variable isLeft. It can take two values, true or false. If it has true, we create the left paddle when called, if it is false it creates the right paddle.
Then create the two paddles by calling the constructor in the setup() function, we show them by using the update() and show() methods. Add the highlighted lines to your exisiting functions:
Phase 3: Move the paddles
Objective: Move the paddles with the keyboard.
Now we add an event loop. Event loops are checking the status of events, i.e. mouse buttons pressed, keyboard entries. We will use the keyboard to control the paddles. First, only enter the function keyPressed(). How do the paddles behalf?
Then add the keyReleased() method and see if the paddles are easier to handle.
IMPORTANT: After starting your sketch, you must click the mouse once inside the canvas for the events to reach your program.
Phase 4: Let the paddles hit the puck
Objective: The puck is reflected from the paddle.
The following two methods allow the puck to be hit by the paddle. Add them inside the class Puck.
In order call the new methods, add the highlighted code inside the function draw().
Phase 5: The puck recognizes the borders of the canvas
Objective: The puck is reflected from the upper and lower edge of the canvas, it disappears when passing the left or right border. Furthermore, in the later case a new puck appears in the middle and starts moving.
Here is the addition to the function draw(). Make sure that the methods are called in the same order as shown here. You may need to rearrange their order.
Phase 6: The complete game:
Here is the complete game with the counter. You need to add the declaration of the two variables to count (i.e. leftscore and rightscore, line 4 and 5 in the main function. Line 31 to 33 show the counter on the canvas.
Inside the class Puck, you add the counter to the method edges(). leftscore++ and rightscore++ add 1 to the counter whenever the puck passes the left or right border of the canvas.
The main function:
Class Puck
Class Paddle
Further things to do:
Change the size of the puck.
Change the paddle size, where do you do it? Do the changes apply for both paddles and why?
Change the colour of background, puck and paddles.
Can you control one paddle with the mouse, what do you need to add/change and where? The paddle should only move on the y axes, irrespective on the x location of the mouse.
Add a second puck. You only need to make changes in function draw(), adding six lines of code will do the job. Do you have an idea how to do it?
Scratch is a block based programming language. You do not need to type code, but you just assemble projects with blocks of different functionality and configure those with simple entry of numbers and text. Scratch runs on a web browser and you can also interface it with some hardware. But where to start with Scratch?
The Code Club is a UK charity that promotes computer science for young people as yourself. They offer very comprehensive and detailed project tutorials, from small animations to a more complex RPG(*) game.
(*) A role-playing game (sometimes spelled roleplaying game;[1][2] abbreviated RPG) is a game in which players assume the roles of characters in a fictional setting. Players take responsibility for acting out these roles within a narrative, either through literal acting, or through a process of structured decision-making regarding character development.[3] Actions taken within many games succeed or fail according to a formal system of rules and guidelines.[4][Source: Wikipedia]
This blog describes the basics on how to use the Arduino with the installable Arduino IDE application. This is the program you need to write code for the Arduino and then upload it on the hardware. Following are three examples on what you can do with the Arduino.
Set up LEDs on a breadboard anc control them with the Arduino.
A short introduction to the GROVE platform that allows you to connect various sensors and actuators to the Arduino by simply plugging connectors to an interface board. This section also gives you links to look for sample projects and code snippets.
A project using NEOPIXELs, controlled by the Arduino.
The following image shows a traffic light arrangement of LEDs. The three LEDs are connected to the Ports 2, 3 and 4. The minus cable from the breadboard gets connected to the GND port of the Arduino.
Arduino with breadboard, a traffic light with LEDs
The wiring scheme on photo.
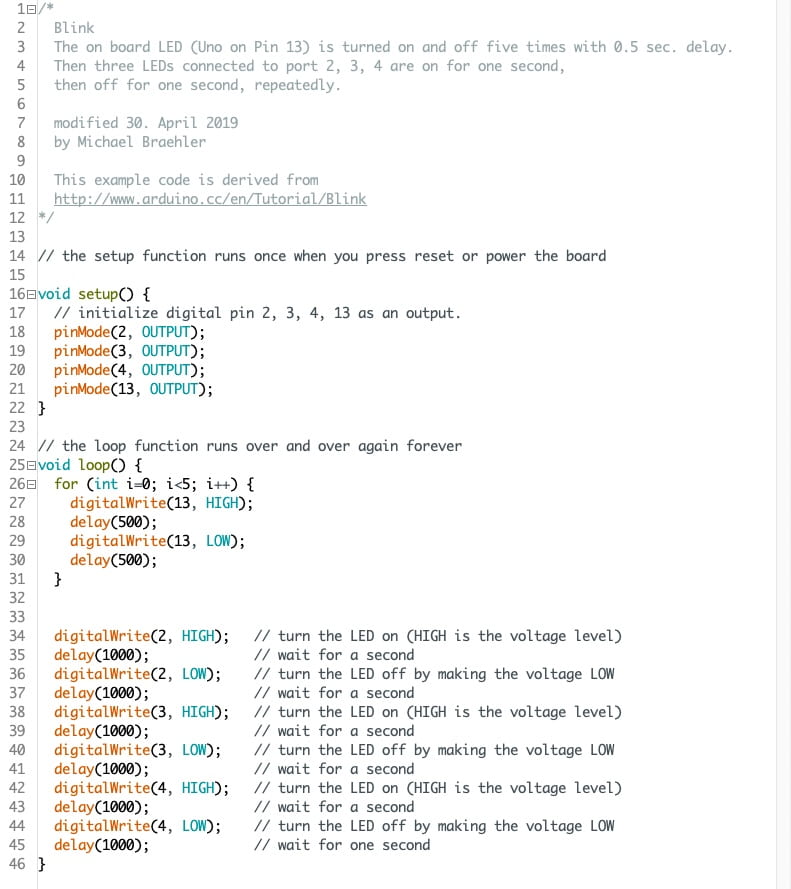
Here is the code doing some on and off with the LEDs.
Using the Arduino with the Grove platform
Introduction
The Grove platform consists out of a shield with 4 pin connectors that allow to easily connect sensors and activators to the Arduino board. The shield is stacked on top of the Arduino board. There are
4 Analog inputs or outputs, labeled A0 to A3
7 Digital inputs or outputs, labeled D2 to D8
1 UART interface for serial communication
4 I2C communication ports, that’s a serial bus, labeled I2C. This bus is used for devices as the Ultrasoundsensor, LCD display and other sensors or activators that send or receive more complex data than what can be handled with the analog and digital ports. Each of the I2C device gets a hardware or software assigned ID so that your code can address each device individually and make it do the things it can do.
Each 4 pin connector has GND (or minus, OV), VCC (this is 3.3V or 5V depending on the switch setting beside the reset button/green power LED) and two data pins, they are different for each connector. When you are using the Grove cables,
red is 3.3V/5V or VCC
black is GND or 0V
white is a data wire, look at the Grove shield
yellow is the other data wire, look at the Grove shield
Project Ideas
Here is a link to the manufacturer of the Grove system, Seeedstudio. The Project One to Project Eight are good ways to create small projects.
Here is a photo with some of the Grove sensors and activators available.
For Project Six, you can also use the “Grove LCD RGB Backlit”. You can find more information including wiring and sample code here. Please also use the code sample shown here as the function calls may be different to those in Project Six.
External libraries for the Arduino IDE (required for the following project with the Neopixels)
For some sensors and activators you need to download external libraries. These contain functions that make it easier for you to use the devices. With the Arduino Version 1.8.9 you can download them easily by selecting “Tools” in the menu and then “Library Manager”.
The photo above shows the library you need to download to run the Grove LCD RGB Backlit module.
The Grove website shown above has a good document for all sensors and activator boards. So check there for more information and in particular sample code that you can then remix to your liking.
Arduino With Neopixel
Here you find a tutorial on how to connect a chain of Neopixels to the Arduino, which library to download and some sample code.
Setup the Hardware
The Neopixel requires more power than the Arduino can handle if all LEDs are on and will destroy it. Therefore you need to beef up the power supply and run the Neopixels with 3 x 1.5V batteries. Have a look again at the first lesson we had and ask for help, here is also a photo of the full hardware setup for your reference.
The red and white cable coming from the Grove shield remain unconnected, the black is 0V and connects to the OV or Minus of the battery pack and the black cable coming from the Grove shield. A red cable with crocodile clamps connects the Plus (+) of the battery pack with the red cable from the Neopixels.
If that’s too much of a hazzle for you, just use the stripe with 5 Neopixels, you can easily fix it on the breadboard, it does not require any additional power. Connect matching cable colours to the Grove interconnection cable, red to red, black to black and yellow to yellow. Then download the library and follow the instructions below. You will need to initialise the Neopixel for 5 Pixels only.
Coding
Once you have the Neopixels and the PC connected to the Arduino, open up the Arduino IDE, download the Adafruit Neopixel library. It also contains sample projects to start with. Have a look in the Menu under File/Example/Adafruit Neopixel. A good starting point is the sketch “simple”. You need to change two values in this program.
The numerical value for the constant PIN needs to match the port number you have chosen. On the photo it is D4, so you enter the number 4.
Next you have to tell the program how many Neopixel your stripe has. The long one has 32, so change the value of the constant NUMPIXELS to 32.
The program is well documented, so just read and do the two changes where it is highlighted.
Here is the complete sample code, reduced to the parts you really need and their comments, all changes have been done already.
When you experiment with the code, the following hints may be helpful:
random(min, max) is a function that returns a random integer number between min and max-1. If you declare random(0, 128) the function will return a value between 0 and 127. You may use it to choose a random colour.
In the programming language C you need to declare the type of a variable before using it. int jvariable is declaring the variable with name jvariable as of type integer, so it can contain whole numbers.
Otherwise loops (for …, while …) and conditionals (if else …) and the highlighting of blocks with curly brackets ( {} ) is similiar to Javascript.
How to delay the execution of something in Javascript?
In order to delay the execution of a code snippet in Javascript, use the setTimeout() method.
Its syntax is as follows:
setTimeout(functionName, delay)
FunctionName is a call back function that will be executed after the time fixed in the parameter delay has passed. In this video you get more details on how to use this function:
General remark before starting with the audio libraries:
The following tutorials are from Daniel Shiffman and can all be found on his Youtube channel “Codetrain”. I have selected some basic ones for you to get started with audio. Please remember that you have to download your audio file first into the editor, only then the player can access them and you can get your code running.
Please remember that you need to log in with P5JS to be able to upload your audio files. You can then drag and drop them into the field opening when you select Sketch/Add File.
Sound with p5.js
Load and play a sound file
Here is again a video about how to load and play an audio file. Again like with image files, you should use the preload function to make sure that the whole file is loaded before you start to play it.
Besides the basics you see how to change the volume, the rate or speed of the playback as well as the pan (left and right side effect).
The following video shows how to add a button playing and stopping the audio.
Here is the finished code for the playing and pausing of the audio track.
Put it all together …
The image and the link to the p5js script at the beginning of this blog show you what you can do while combining audio, images and small animations in P5JS. Give it a try!
This is a copy of a book introducing P5JS covering all basic features.
I suggest that you have a look, copy and paste some code snippets into the editor to execute them and then try to understand what is happening. The text will help you further with that.
In the coming two lessons we will focus on the content in Chapter 7 (images) and 8 (sound). To try out the projects, you need to download the images and sound files provided. They are in media (images, sounds, etc.), you can download them from this Github Repository.
If you are not too comfortable yet with p5js, I encourage you to start with the earlier chapters first and try to get deeper into programming.
Flappy Bird
Here is a video describing an implementation of the Flappy Bird game with P5JS.
This is a link to another Github repository with the source code for the game. You need to open the files, copy and paste the content into files with the same name that you created in your p5 editor. To create the files pipe.js and bird.js, select “Sketch” in the editor’s menu and then “New File”. Enter the file name with extention. For sketch.js and index.html just replace the content of the existing files.
Here is a cheat sheet summarizing the most important methods P5JS provides to create graphics.
The following video introduces you to the concept of conditionals. They allow a program to branch, to do different things depending of the evaluation of the condition. Example:
If an object reaches the border of the canvas, then reverse its moving direction.
In Javascript they are of the form
[code]if ( Boolean Expression ) { do something }.[/code]
A Boolean Expression is an expression that returns either True or False. If the expression gives true, the part following inside the curly brackets is executed, otherwise the program continues aftere the curly bracket.
In order to get True or False, you can apply different types of operators, normally on a combination of fixed values and variables. Today we will use relational operators.
A relational operator is of the form <, >, <=, >=, ==, ===, !=. They compare two values of same type, if the result is correct, the operator returns True, otherwise False. Here are two examples for relational operators:
Conditionals are used with variables. These can contain different values, and depending on their actual value and another fixed or also variable value, the operator returns True or False.
Here is the video:
There is another family of operators used frequently, logical operators. They work on boolean values. The most common operators are AND (in JS “&&”) and OR (in JS “||”).
Example for a logical expression within a conditional:
IF the ball is touching the upper border of the canvas AND at the same time touching the right border of the canvas, THEN do something.
This would express in Javascript as follows assuming that you have defined a vector object ball with the coordinates x and y. You can get its x coordinate with ball.x, the y coordinate with ball.y. Furthermore you need to know that the upper border has the y value 0 and the right border the x value width. Then you could write:
You can describe the result of a logical AND operator depending on two input values in a table as follows:
Value 1 Value 2 Result True True True True False False False True False False False False
The other important logical operator is the OR operator. It can be described with the following table:
Value 1 Value 2 Result True True True True False True False True True False False False
Following are some exercises you can open, modify and then save in your account. You will need to manipulate colours, the website below allows you to determine the three integer numbers to choose a colour:
Draw a vertical line at x=150, give the line a thickness of 10 units and then make the colour of the background change when you pass the line from left to right.
Change the background colour when you go beyond the bottom of the canvas.
Change the the background colour when you reach the top right corner. You will need to use a logical operator together with two relational operators.
Change the colour of the background to the left of the vertical line x=150 to red when you move the mouse beyond the line. You may need to use a big rectangle to achieve this.
Copy the code and make a new project with it. Create a rectangle in the middle of the canvas. When the mouse is hovering over the rectangle, it should change its colour.
Revisit the Snake Game
Here is another full implementation of the snake game. Once you have opened the editor, you need to click on the small flash on the top left of the editor to open the file menu. The full code for the game is in the files script.js and snake.js.
Change the size of the canvas and see what happens.
Change the colour of the food
Change the size of the food in order to get a bigger playground.
Change the speed of the game
Reassign different keys for moving the snake.
Use the mouse to control the snake, not the keyboard.
Once you have opened the link, make sure that you have logged into your account. Once you have made changes to the code, you can save them as your own under “File”, “Save”. Don’t forget to give the project a suitable name.
Modify a clock
Here is a video showing how to create a “analog” dial clock with P5JS.
You may look in the References section of http://www.p5js.org to learn more about the methods transform(), rotate, push(), pop() as well as arc(…).
The “%” operator gives the remainder of a division on an integer number. Ex.: 23 % 12 = 11, 4 % 2 = 0, 5 % 2 = 1.
the map() function is defined in the p5js reference as follows:
Re-maps a number from one range to another.
In the example given in the reference, the number 25 is converted from a value in the range of 0 to 100 into a value that ranges from the left edge of the window (0) to the right edge (width). So you do not need to do the calculation yourself.
A variable is a sort of container that holds a value, a string (characters or text), a number or other object references. You can create a value by clicking and dragging on the variable tab at the bottom of the code panel. Then a small window will pop up that allows you to define its type (decimal, integer, text, …), set an initial value and give it a name.
Next time you are assembling a procedure in the code editor, and this procedure also requires parameters (values), matching variables will be suggested in addition to the fixed values you have used so far.
Here are some additional exercises, they prepare you for the game we will do in the following lessons, step by step.
Create a smiley
Smiley with p5.js
As a first step only create the lower lip, then you have a “classical” smiley. You need – a circle for the head – two ellipsoids for the eyes – one arc for the mouth. – You may also need to choose filling colours along the way, do it before you are drawing shapes. – Then add another arc and colour the space in between upper and lower lip.
Create a Packman sprite
Hint: There is a shape function “arc(…)” that allows you to create the body of the Packman with one line. Have a look in the documentation and play around with the parameters inside the parenthesis.
Don’t forget that angles are entered in radians. 0 degree is 0 radian, 180 degrees are PI radians and 360 degrees are 2*PI radians. PI is a constant in p5js, its actual value is 3.14… You only need to generate the Packman, the three small circles we do not need for now.
Control the movements of your sprite with the mouse
How to interact with your program? How can you control what is happening on the canvas?
P5JS gives you access to the mouse and the keyboard.
The mouseX and mouseY variables return you the current position of the mouse cursor. You can use it to make a rectangle follow your mouse on the canvas:
Here is a video p5js mouse position that shows you more about this mouse variables and some related variables.
Your program can also recognize when the mouse is pressed and then do something. Here is a code snippet, you add your action between the curly brackets.
A shorter way for the if statement is simply “if (mousePressed) { … .”
[code language="javascript"]

if (mouseIsPressed == true) {
// do something
}

[/code]
Control the movements of your sprite with the keyboard
You can also use the keyboard to control what is happening on the canvas. Here is a code snippet that uses four different keys. You find more information about the subject of keycodes in the reference documentation.
Make a rectangle change its colour depending on mouse or keyboard events
Now you have all the tools you need to create a small project that changes colour and or position of a rectangle. Here is a nice example
Next Step for the Packman game
With the examples given before, you can now make the Packman follow a horizontal line along the x axes. The tricky part consists in making him turn and then also turning his face. Think about a solution before you have a look https://editor.p5js.org/mikefromd/embed/Skn51kA3m“>here and this is the code